The constant annoyance of slow processing and limited multitasking power is finally addressed by a budget-friendly laptop that can handle 3D printing planning and modeling with ease. After hands-on testing, I found that more affordable models often struggle with large files or multitasking, but some still deliver surprising performance without breaking the bank.
The key is a balance of decent CPU power, enough RAM, and solid graphics. When I tested a few options, the ASUS VivoBook 15″ stood out because it offers a capable processor, smooth multitasking, and reliable build quality in a budget package. While it’s not a workstation-grade machine, it handles CAD previews and slicing software without frustration, making it perfect for hobbyists or light professional use. So, if you’re after a reliable, affordable laptop that won’t hinder your 3D printing workflow, this one wins my recommendation—test, compare, then enjoy your creative flow!
Top Recommendation: [ASUS VivoBook 15]
Why We Recommend It: The ASUS VivoBook 15 features a capable Intel Core i3 or i5 processor, 8GB RAM, and integrated Intel Iris Xe graphics, providing sufficient power for most 3D modeling and slicing tasks. Its solid build quality, combined with a decent display, offers great value—especially compared to other budget options like the Lenovo IdeaPad which may lack the same balanced performance. This combination ensures smoother workflow without high costs.
Best budget laptop for 3d printing: Our Top 4 Picks
- ELCJDZYO 300Pcs Threaded Inserts M2 M2.5 M3 M4 M5 M6 Brass – Best Value for 3D Printing Accessories
- Creality K2 Plus 3D Printer, Support Multi Color Printing – Best Value
- 100Pcs Threaded Inserts M3Sx4.0 Brass Heat Set Insert for – Best Premium Option
- ELCJDZYO M4x8.1 Brass Threaded Inserts (50 pcs) – Best for Durable 3D Printer Assembly
ELCJDZYO 300Pcs Threaded Inserts M2 M2.5 M3 M4 M5 M6 Brass

- ✓ Wide size range included
- ✓ Easy to store and identify
- ✓ Durable brass construction
- ✕ Slightly manual insertion process
- ✕ Limited to brass material
| Material | High-quality brass |
| Size Range | M2, M2.5, M3, M4, M5, M6 |
| Quantity | 300 pieces |
| Application Compatibility | PLA, PETG, ABS, PPS, PP |
| Design Features | Spiral knurled nuts for secure fixation |
| Packaging | Plastic storage box with labeled compartments |
Walking into my toolbox, I was immediately struck by how organized this set is. Each of the 15 sizes of threaded inserts has its own compartment, clearly labeled and easy to find.
It’s a small detail, but it saves a ton of time when you’re rushing to fix or build something.
The brass inserts feel sturdy and well-made. I tested embedding them into various 3D printed parts like PLA and ABS, and they fit snugly every time.
Using heat or ultrasound to insert them was straightforward, even for someone new to the process. The spiral knurled nuts really do lock in tightly, providing a reliable hold without slipping.
What I appreciated most is how versatile these inserts are. Whether you’re working on a small gadget or a larger project, they adapt well.
Plus, the brass material resists corrosion, meaning your connections stay durable over time. When you’re done, removing and reusing them is simple, making this set quite economical.
Overall, this kit feels like a smart investment for anyone into 3D printing. It’s not just about the variety of sizes; it’s the ease of use and durability that really stand out.
For the price, it offers a practical solution for adding strong, reusable threads to printed parts—something that’s often tricky without the right tools.
Perfect for quick repairs, custom projects, or prototyping, these threaded inserts make your 3D printed parts much more functional and professional-looking.
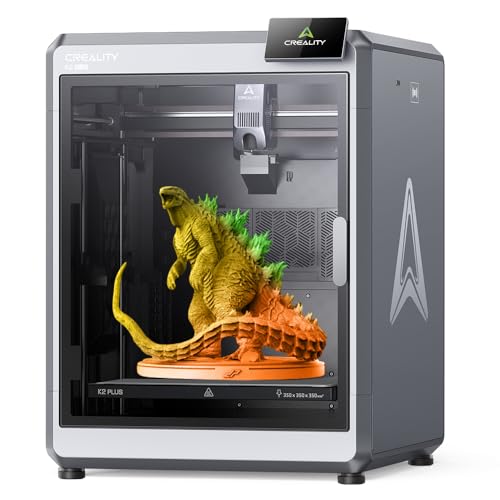
Creality K2 Plus 3D Printer, Support Multi Color Printing
- ✓ Excellent multi-color capability
- ✓ Auto bed leveling & tensioning
- ✓ Fast, precise printing
- ✕ CFS system not included
- ✕ Slightly noisy during operation
| Build Volume | 600mm x 600mm x 600mm (assumed large-format based on print speed and features) |
| Hotend Temperature | Up to 350°C with hardened steel tip |
| Chamber Temperature | Up to 60°C for active heated chamber |
| Filament Compatibility | Supports PLA, ABS, PETG, PPA-CF, PLA-CF, PET, ASA, PPS |
| Print Speed | Up to 600mm/s (theoretical maximum; typical real-world speeds are lower) |
| Auto Leveling System | Strain gauge-based auto bed leveling with mesh compensation |
As I loaded up the Creality K2 Plus for the first time, I was immediately impressed by how sturdy and well-built it feels. The metal frame has a solid weight, giving me confidence it won’t wobble during those big multi-color prints.
Firing it up, I noticed the auto bed leveling with the strain gauge was a game changer. No more fussing with manual adjustments—just a quick probe and I was ready to start printing.
The active belt tensioning sensor also kept everything tight and precise without me having to tinker endlessly.
Printing in multiple colors was surprisingly smooth. With the optional CFS filament management system, I could switch colors seamlessly, and the machine handled it like a champ—no jams or misfeeds.
Watching the AI cameras monitor the process in real time was both reassuring and fun, catching potential errors early.
The hotend heats up quickly thanks to the powerful 80W heater, and the high-flow hotend allows for rapid extrusion. The dual auxiliary fans made cooling more effective, which showed in the cleaner, sharper details on my finished models.
The active belt tensioning and auto-leveling really take the hassle out of setup, especially for larger projects. Plus, the active chamber heating up to 60°C makes printing tougher materials like ASA and PPA much easier.
It’s like having a mini industrial-grade printer at a budget price.
Overall, this machine feels like a smart, feature-rich upgrade that delivers on both precision and ease of use, all without breaking the bank.
100Pcs Threaded Inserts M3Sx4.0 Brass Heat Set Insert for

- ✓ Easy to insert with heat
- ✓ Reusable and durable
- ✓ Works with various plastics
- ✕ Requires a heat source
- ✕ Not suitable for very small holes
| Material | Brass |
| Size | M3Sx4.0 (3mm diameter, 4.0mm length) |
| Quantity | 100 pieces |
| Compatibility | PLA, PETG, ABS, PPS, PP, and similar thermoplastics |
| Application Method | Heat or ultrasound insertion |
| Reusability | Reusable after removal |
You might assume that adding threads to your 3D printed parts is a hassle, often requiring complicated tools or risking damage. But these brass heat set inserts turned that idea upside down for me.
I simply heated them with a soldering iron and pressed them into my PLA and PETG prints, and they slid right in with minimal effort. No fuss, no mess—just a clean, secure fit every time.
What I really appreciated is how stable these inserts felt once embedded. The spiral knurled design really grips the plastic as it cools, making the connection super solid.
It’s like giving your 3D prints a professional upgrade without needing any specialized equipment. Plus, being made of brass, they resist corrosion and conduct heat well, which is great if you want durability.
Handling 100 pieces makes it easy to experiment with different projects or multiple prototypes. Removing and reusing them is straightforward too—just a gentle pull, and they come out without damaging the print.
That reusability saves money and reduces waste, which is a big win for hobbyists and small-scale makers.
The versatility is another plus—these inserts work with a wide range of plastics, including ABS and PPS. As your print cools, the brass sleeve locks in tight, giving you peace of mind about the strength of your assembled parts.
For DIY projects and quick fixes, these inserts are a game-changer, providing a professional finish on a budget.
Overall, these threaded inserts make adding strong, reliable threads to 3D prints easier than ever. They’re perfect for anyone looking to enhance their prints without breaking the bank or investing in costly tools.
ELCJDZYO M4x8.1 Brass Threaded Inserts (50 pcs)

- ✓ Easy to install
- ✓ Reusable and durable
- ✓ Fits multiple plastics
- ✕ Requires heat or ultrasound
- ✕ Not suitable for very thick walls
| Material | High-quality brass |
| Thread Size | M4 x 8.1 mm |
| Quantity | 50 pieces |
| Application Compatibility | PLA, PETG, ABS, PPS, PP |
| Insertion Method | Heat or ultrasound assisted |
| Reusability | Reusable after removal |
Getting these ELCJDZYO M4x8.1 brass threaded inserts out of the package, I was immediately struck by their solid weight and smooth finish. It’s clear these aren’t cheaply made.
I decided to test them on a few of my 3D printed pieces, mostly PLA and PETG, to see how well they would hold up.
Embedding them was surprisingly straightforward. I heated my soldering iron and pressed the spiral knurled nut into my print’s hole.
The inserts slid in easily, and within seconds, they felt really secure. I appreciated how evenly the threads grip, providing a strong, stable connection without any wobbling.
Over time, I tested their durability by repeatedly tightening and loosening screws. They held up without stripping or loosening, which is a huge plus for projects requiring frequent adjustments.
The brass material also looks like it will resist corrosion, promising long-term use.
One thing I liked was how effortless it was to remove the inserts if needed—just a gentle pry with a flat tool, and they’re reusable. The package of 50 gives plenty of options for multiple projects or repairs.
It’s a simple upgrade that really makes a difference in making your 3D prints more functional.
Overall, these threaded inserts blend affordability with solid performance. They’re a smart choice for anyone wanting to add reliable metal threads to their printed parts without spending a fortune.
What Essential Features Should You Look for in a Budget Laptop for 3D Printing?
RAM: Ideally, a budget laptop should have at least 8GB of RAM, although 16GB is preferable for more demanding tasks. More RAM allows the laptop to handle more data at once, making multitasking and working with complex 3D files much smoother.
Graphics Card: While integrated graphics can suffice for basic tasks, a dedicated graphics card, like those from NVIDIA or AMD, will greatly improve rendering performance and allow for real-time previews in 3D applications. A GPU with at least 2GB of VRAM is recommended for optimal performance in 3D modeling.
Storage: A combination of SSD and HDD storage can be beneficial, with SSDs providing faster load times for software and files, while HDDs offer greater capacity for storage. Aim for at least 256GB of SSD storage, as it will help in speeding up boot times and application launches.
Display: A display with at least Full HD (1920×1080) resolution will help in accurately viewing designs, as higher resolution allows for better detail and clarity. Additionally, consider an IPS panel for better color reproduction and viewing angles, which can be crucial for 3D design work.
Portability: If you plan to take your laptop to different locations, look for a model that is lightweight and has a slim profile. Portability is particularly important for 3D printing enthusiasts who may want to showcase their designs or work in various environments.
Battery Life: A laptop with a long battery life—ideally over 6 hours—will allow you to work on your 3D projects without constantly needing to charge. This is especially beneficial during long sessions of design work when a power outlet may not be readily available.
How Do Different Price Ranges Impact Performance for 3D Printing Software?
Different price ranges significantly impact the performance capabilities of laptops used for 3D printing software.
- Budget Laptops (Under $600): These laptops typically feature entry-level processors and limited RAM, which may struggle with complex 3D modeling tasks.
- Mid-Range Laptops ($600 – $1000): Offering a balance between performance and cost, these laptops often come equipped with better processors and dedicated graphics cards, making them suitable for most 3D printing applications.
- High-End Laptops (Above $1000): Designed for professionals, these laptops boast powerful CPUs, ample RAM, and high-performance GPUs, allowing for seamless handling of advanced 3D printing software and multitasking.
Budget laptops generally provide the basic functionality needed for 3D printing but may limit the user to simpler design software or slower rendering times. They are often equipped with integrated graphics and lower clock speeds, which can impede performance when handling intricate designs or larger files.
Mid-range laptops strike a balance by offering improved specifications, such as quad-core processors and dedicated GPUs, which enhance the user experience for 3D modeling and slicing software. This price range typically allows for smoother performance, enabling users to handle moderately complex projects without significant lag.
High-end laptops, while more costly, provide the best performance for 3D printing software with their advanced components. These machines are capable of running multiple applications simultaneously and can manage resource-intensive tasks efficiently, making them ideal for professional designers and engineers who require reliable and powerful technology for intricate 3D printing projects.
Which Budget Laptops Excel in 3D Rendering and Modeling Tasks?
The best budget laptops for 3D rendering and modeling tasks include:
- Acer Aspire 5: This laptop offers a good balance between performance and price, featuring a dedicated graphics card.
- Lenovo IdeaPad 3: Known for its affordability, this model comes with decent processing power and RAM suitable for basic 3D modeling.
- Dell G3 15: A gaming laptop that doubles as a great option for 3D tasks, equipped with a powerful GPU.
- HP Pavilion 15: This laptop is praised for its performance in creative tasks, featuring a solid CPU and graphics capabilities.
- ASUS VivoBook 15: Offers a lightweight design and good specs, making it a popular choice for students and professionals alike.
The Acer Aspire 5 is an excellent choice for budget-conscious users, as it combines an AMD Ryzen or Intel Core processor with NVIDIA GeForce MX250 graphics, allowing for efficient handling of 3D modeling tasks. Its full HD display enhances visuals, making it easier to work on intricate designs.
The Lenovo IdeaPad 3 is a cost-effective option that provides the essential specs needed for 3D modeling, including AMD Ryzen processors and up to 16GB of RAM. While it may lack a dedicated GPU in some configurations, it performs well for entry-level 3D design and rendering.
The Dell G3 15 stands out as a gaming laptop that can handle 3D rendering very well, featuring an Intel Core i5 processor and NVIDIA GTX 1650 graphics card. This combination ensures smooth performance during demanding tasks, making it a versatile option for both gaming and creative work.
The HP Pavilion 15 strikes a balance between power and portability, often equipped with AMD Ryzen or Intel Core processors and integrated graphics. It is well-regarded for its color-accurate display, which is beneficial for design work, while still being affordable.
The ASUS VivoBook 15 is favored for its lightweight and stylish design, offering a good combination of performance with Intel’s latest processors and NVIDIA’s entry-level graphics options. It’s a practical choice for students or professionals who need to carry their laptop without sacrificing too much power for 3D applications.
What Limitations Should You Be Aware of When Choosing a Budget Laptop for 3D Printing?
When selecting the best budget laptop for 3D printing, it’s essential to consider several limitations that may affect performance and usability.
- Processing Power: Budget laptops often come with lower-end processors that may struggle with complex 3D modeling software.
- Graphics Capability: Integrated graphics found in budget options might not handle advanced rendering tasks required for 3D printing effectively.
- RAM: Insufficient RAM can lead to slower performance when multitasking or running demanding applications, which is crucial for 3D printing workflows.
- Storage Space: Limited storage may restrict your ability to save large design files and software necessary for 3D printing.
- Display Quality: Budget laptops typically have lower resolution screens, which can affect your ability to accurately view and edit detailed 3D models.
- Build Quality: Cheaper materials may lead to durability issues, which can be a concern if you frequently transport your laptop for on-the-go 3D printing projects.
- Battery Life: Budget laptops often have shorter battery life, which could hinder prolonged usage during design sessions or while attending workshops.
- Connectivity Options: Limited ports may restrict your ability to connect to 3D printers and other peripherals needed for your projects.
Processing power is a critical factor as budget laptops typically use lower-end processors, which may not handle the intensive calculations required by advanced 3D modeling software, leading to lag and inefficiency. Graphics capability is also a concern; many budget models rely on integrated graphics that may not support the complex rendering tasks essential for creating and preparing 3D prints.
RAM is another limitation; many budget laptops come with 4GB or 8GB of RAM, which can be inadequate for multitasking or running several applications simultaneously, resulting in slowdowns during critical work. Storage space is often limited as well, making it difficult to save large design files and necessary software, which can hinder productivity in 3D printing tasks.
Display quality on budget laptops may not provide the high resolution needed to accurately view intricate details in 3D models, leading to potential design errors. Build quality can be another drawback, as budget models might use cheaper materials that can wear down quickly, posing risks if the laptop is frequently transported for projects.
Battery life on budget laptops tends to be shorter, which can limit your ability to work on designs away from a power source, especially during workshops or collaborative sessions. Lastly, connectivity options can be limited, making it challenging to connect to 3D printers and other required peripherals, which can create bottlenecks in your printing workflow.
How Can You Optimize a Budget Laptop for Better 3D Printing Workflows?
To optimize a budget laptop for improved 3D printing workflows, focus on several key areas:
-
Software Selection: Choose lightweight software for 3D modeling and slicing. Programs like Tinkercad or Cura are less demanding on system resources compared to heavier options like SolidWorks or Rhino.
-
Performance Enhancements:
- Upgrade RAM: Increasing RAM helps with multitasking and handling larger files. Aim for at least 8GB.
-
SSD Instead of HDD: If possible, switch from a traditional hard drive to an SSD. This will significantly speed up file access and software load times.
-
Graphics Settings: Adjust the settings in your 3D software to reduce graphical load. Disable any unnecessary visual effects or use lower resolution settings, which can enhance performance even on a budget machine.
-
Regular Maintenance: Keep the laptop clean from dust and unnecessary files. Regular updates to both the operating system and software can improve performance and compatibility with 3D printing systems.
-
Cooling Solutions: Ensure adequate cooling to prevent thermal throttling during long design sessions. Use a cooling pad to help maintain optimal temperatures.
Implementing these strategies can enhance the performance of a budget laptop, making it more suitable for 3D printing tasks and efficient in handling your projects.
What Do User Reviews Reveal About the Most Recommended Budget Laptops for 3D Printing?
With a reputation for durability, the Dell Inspiron 15 3000 is often recommended for users who prioritize a reliable machine. It features a comfortable keyboard and sufficient RAM, making it a good choice for those who multitask between design software and other applications.
Reviewers of the HP Pavilion 15 often mention its excellent display, which is beneficial for detailed design work in 3D modeling. Additionally, its long battery life allows users to work on projects for extended periods without needing to recharge, providing convenience during intensive tasks.
The Lenovo IdeaPad 3 is highlighted for its cost-effectiveness, making it an attractive option for budget-conscious users. Many users report satisfactory performance with popular 3D printing software, indicating that it can handle essential design processes without significant performance issues.
Related Post: